Saturday, 11 February 2012

Tweed and Coffee Sack Chair

This week I completed the other Parker Knoll chair. I didn't really take any photos while I did it because it is exactly the same as my nursery chair! The only extra thing this one needed was a spring in the back being put on. As you can see in the photo below the bottom spring had fallen off on one side. This was because the eye that the hook on the end of the spring was attached to had come off.


So I drilled into the wood and attached a new eye before rehooking the spring on.


And now there is a lovely new chair to be sent up to the shop in Stonehaven.


Grey tweed with coffee sack on the side

Coffee sack on the back

Coffee sack piping
And for no other reason than she is incredibly cute, here's Henny...


Friday, 3 February 2012

Post Office Table

My parents bought an old post office table years ago at a farm sale. It has pigeon holes and a parcel shelf and Mother Goose has always been convinced it would make a fabulous changing table. So we were all very excited that it would finally be able to come out of my parents old barn and be put to good use in Baby Briggs' room.
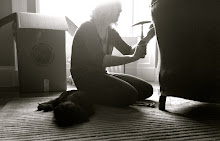
My dad sanded it, put it in his car and drove it all the way up to Edinburgh. There was then much huffing and puffing, and groaning and grunting, as Dad and Mr Briggs carried it up the stairs to our first floor flat. Although it separated into two parts this was a pretty hefty bit of furniture. Here is Dad reassembling it in Baby Briggs' room.


The bottom of the parcel shelf was still a little grubby looking even after sanding so Dad fitted a piece of plywood to cover it. With a changing mat on top it will be perfect.


There are plenty of pigeon holes for nappies, baby wipes, things I don't even know we need yet, and of course my old childhood favourite books - here is my old Beatrix Potter collection, tied up with string...

G.B is inscribed underneath the parcel shelf. For Great Britain perhaps? Or Great Briggs?

The only problem we have with this lovely old piece of furniture is that after it was used as a post office table it was used by a farmer to store his old tractor parts. This resulted in some of the shelves being covered in oil, which has seeped into the wood. The day after we put it in Baby Briggs' room, Mr Briggs and I realised that the room smelt like an old workshop! Although it's quite a nice old smell - it reminds Mr Briggs of his grandads shed - I can't imagine it will be very good for a tiny baby to be breathing in the smell of oil, and it is getting stronger! I tried covering the whole piece of furniture in baking powder (and bicarbonate of soda because I wasn't sure which one you are meant to use!), as this is meant to soak up smells. Maybe I didn't use enough or leave it on long enough because it still smelt. 
So then I bought a carbon activated blanket. Apparently activated carbon, or activated charcoal, is extremely porous and therefore it's increased surface area allows it to absorb pollutants and odours. Supposedly all I need to do is leave this blanket on the piece of furniture that smells for 12 hours and the blanket should soak up the smell...

Fingers crossed that this works, or maybe we will have to redo Baby Briggs' room in a tractor theme, complete with smell! If anyone has any other suggestions for how to get rid of the smell of oil please do let me know as I really don't want to have to get rid of this gorgeous piece of furniture.

On a slightly different, but still unexpected, note, work to get our home finished in time for Baby Briggs' arrival continues. This week we had new shower fittings put in but when the tiler came to remove the tiles ready for the new ones, a supposedly quick and easy job, all the plaster work fell off the wall!! This is how our bathroom looks now...

The joys of old buildings.

Saturday, 28 January 2012

Nursery Chair - Done!

It took a bit of thought and a lot of effort but the comfy chair for Baby Briggs' room is now done! First the legs were painted and the back went on...

Then the sides (these were the trickiest bits)...

You can see springs in the photo above, which is what the seat will rest on but to make it extra secure I attached a layer of strong canvas...

I stitched, and piped, the cushion and voila we have a new chair!


The back was covered with a lovely coffee sack...

And finally, check out this little guy made from the off-cuts of material and some chair stuffing!


Saturday, 21 January 2012

Nursery Chair

This week I started work on two mini Parker Knoll armchairs. As I wanted to keep one in our nursery and sell the other, I decided to do mine first so that if I made any mistakes on the first one then I would know how to do the second one better. I am so glad I decided to do this as I have already had to redo a couple of bits! 
It took me nearly two days to strip, due to stubborn staples and an ever growing bump getting in the way of bending and general flexibility! I haven't done enough of the new upholstery (that I'm happy with) to post photos yet but here is how the chair looked while being stripped.

The back

The front

The Parker Knoll!

The back stripped, showing the springs that keep the chair in place when you lean back.

Stripped and ready to be put back together again.

Saturday, 14 January 2012

Starting as I mean to go on

I have had a productive start to 2012 and am determined to keep it up. I already know that I like organisation and routine, and with a baby arriving in April, I feel that 2012 needs to be the year that I make every effort to keep organised and be as productive as possible. That includes this blog, so I will be trying my hardest to update it every week... or maybe every two!

So far this year Mr Briggs and I have painted Baby Briggs' room and got started on some decorations (these will be posted soon), had a couple of days romantic break in London, ordered a beautiful cot, looked at pushchairs and ordered a new kitchen. For me one of the most exciting things has been that my tub chair has been sold in the shop in Stonehaven, and someone even went in and asked if there were any more! I can't explain how exciting it is that someone liked a piece of my furniture enough to buy it, and it has really inspired me to get on with more upholstery this year...

So the past two days I have been working on a headboard for our bedroom. This is how our bed used to look, a bit dull.


So I bought some mdf from the nice people at Walker Woodstock - I use the Gorgie road depot where they are all very friendly and will cut your wood to whatever size you need. The full size sheet wouldn't fit in our car so I had it cut in half and when I got home drilled some mdf struts to the back to put it back together, and then glued some foam to it. The foam was ordered from eFoam, who I would definitely recommend as the site is simple to use and they always deliver really quickly.


Next I attached my material - "Linen Stripe" from Laura Ashley. I like working with stripes as they give you something to work to when attaching material to a straight edge.
We don't have much space either side of our bed so instead of having lamps either side we bought some clip on lights from Ikea. I attached two strips of mdf to the back of the headboard so that these could be clamped to the back and allow the light to shine out round the sides of the bed.


Two headboard forks were then attached to the back to allow the headboard to be fitted to the bed. 


And now this is how it looks.....


The artwork in the last photo is a 19th century Japanese block print that I bought from Liberty in London (with some very generous Liberty gift coins a kind friend gave us for a wedding present). I bought it specifically to go in our newly decorated bedroom and was worried the colours wouldn't be quite right - I would say they are pretty much perfect!

Monday, 28 November 2011

New(ish) Coffee Table

The first piece of furniture that Mr Briggs and I bought together was a Victorian scrub top kitchen table. The legs weren't really equal and there was a huge bow in the top of it but we loved it. And it was while eating lunch at this table that Mr Briggs proposed to me. So when we decided to redo our kitchen and realised that our table wouldn't go with the modern new look we had a dilemma. With a baby on the way we also needed a bigger table as our original one only sat 4 and we anticipate many guests and a growing brood over the next few years! So we found a beautiful (new) oak table for our kitchen with no funny angles or wobbles.
And then, we made our lovely old table into a coffee table!! We did feel a bit bad sawing the legs off an antique piece of furniture but we knew we would never again need a small kitchen table and couldn't bare to part with such a sentimental piece.


The above photos show me using a marking gauge to score a line in the legs where we wanted to saw them off. This meant we had an even line all around to follow, so that we would not (supposedly) saw in wonky lines!
Line left by the marking gauge

Next, I started off the sawing.
When sawing you should saw down your line vertically on the side you can see then start sawing horizontally. This is because if you have sawn evenly down the line, when you start sawing horizontally your saw SHOULD be locked into position from the vertical line and therefore saw straight all the way down. Hope that makes sense to anyone attempting this!
Mr Briggs finished the sawing off for me when my arms got tired!
I then sandpaper the bottoms of the legs while Mr Briggs carried on sawing and the dog kept a close eye on our work.
And then we ended up with a perfect coffee table, just high enough for Henny to rest her weary head on after all that work.

Friday, 4 November 2011

Cushions for sale!

I made a few Harris Tweed cushions last week with ribbon trim, and now they are in a REAL SHOP! How exciting! You can see these comfy cushions in John A W Briggs of Stonehaven (yes we are related!). He is actually a Persian rug specialist but has kindly offered to see how some of my creations sell - the tweed tub chair is up there too. We will be going up there with some more cushions, and possibly some dining chairs, in a couple of weeks so I will post some photos of the shop then. For now here are the latest cushions.