Monday 28 November 2011

New(ish) Coffee Table

The first piece of furniture that Mr Briggs and I bought together was a Victorian scrub top kitchen table. The legs weren't really equal and there was a huge bow in the top of it but we loved it. And it was while eating lunch at this table that Mr Briggs proposed to me. So when we decided to redo our kitchen and realised that our table wouldn't go with the modern new look we had a dilemma. With a baby on the way we also needed a bigger table as our original one only sat 4 and we anticipate many guests and a growing brood over the next few years! So we found a beautiful (new) oak table for our kitchen with no funny angles or wobbles.
And then, we made our lovely old table into a coffee table!! We did feel a bit bad sawing the legs off an antique piece of furniture but we knew we would never again need a small kitchen table and couldn't bare to part with such a sentimental piece.


The above photos show me using a marking gauge to score a line in the legs where we wanted to saw them off. This meant we had an even line all around to follow, so that we would not (supposedly) saw in wonky lines!
Line left by the marking gauge

Next, I started off the sawing.
When sawing you should saw down your line vertically on the side you can see then start sawing horizontally. This is because if you have sawn evenly down the line, when you start sawing horizontally your saw SHOULD be locked into position from the vertical line and therefore saw straight all the way down. Hope that makes sense to anyone attempting this!
Mr Briggs finished the sawing off for me when my arms got tired!
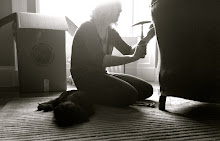
I then sandpaper the bottoms of the legs while Mr Briggs carried on sawing and the dog kept a close eye on our work.
And then we ended up with a perfect coffee table, just high enough for Henny to rest her weary head on after all that work.

Friday 4 November 2011

Cushions for sale!

I made a few Harris Tweed cushions last week with ribbon trim, and now they are in a REAL SHOP! How exciting! You can see these comfy cushions in John A W Briggs of Stonehaven (yes we are related!). He is actually a Persian rug specialist but has kindly offered to see how some of my creations sell - the tweed tub chair is up there too. We will be going up there with some more cushions, and possibly some dining chairs, in a couple of weeks so I will post some photos of the shop then. For now here are the latest cushions.


Sunday 23 October 2011

Piano Stool

I have just finished upholstering the top of a piano stool, while this clever lady fixes the bottom half. I forgot to take any before photos but here is what it looks like now.
The underneath is missing a panel so I attached plenty of webbing and a hessian cover to take the weight of people sitting on it. A block of firm foam was then glued on top and a calico layer attached to pull this into shape.


The top layer is a lovely pinstriped green Harris Tweed. It was more difficult than I expected to get the stripes to line up straight...


Or to get them mostly straight!


Last of all a light green braiding was attached around the edges to cover the staples.


 Once the top has been reintroduced to it's legs I will show you the finished product!

Saturday 22 October 2011

Comments!

So I had some lovely comments on here about the last chair, and I tried to comment myself to say"thank you", but my own blog wouldn't let me comment! I have no idea what I am doing wrong but every time I write a comment, pick an id (it doesn't matter what id I choose) and hit enter, the page refreshes and my comment isn't there. So this post is to say thank you for those lovely comments Sam and Zoe, and to let you all know how much I really appreciate kind words about my work, whether they are on here, on facebook, or in person. When you've been working hard on something and putting all your creativity and personality into that work, it is so heartwarming to have someone tell you that they like it. Suddenly all the hard work and frustration becomes worthwhile.
Thank you!

Friday 14 October 2011

My Kitchen Chair

I have always wanted a kitchen big enough to hold a dining table and sofa so that everyone can gather in one room comfortably - like my mums kitchen! Our kitchen won't hold a sofa but it does have space for a chair. Over the summer I bought this lovely old thing...


Mr Briggs though refers to it as a smelly old thing and told me this week that if I didn't recover it quickly it would have to go!


So I stripped it back, until it looked like this...

And in the process got my fingers spiked by many needles and found this odd collection...

I knew that I had lots of gorgeous Harris Tweed from our honeymoon, but I didn't have enough to cover the whole chair. So I picked a green and brown tweed that matched the old coffee bean sacks I had bought for these chairs. The sacks were a bit of a nightmare to work with and there was the potential for it to look awful but Henny and I gave it our best shot.


My beautiful assistant "helping" me cut out the tweed.


And we were VERY pleased with our efforts. This is possibly my favourite piece of work that I have done. My iphone photos don't really do it justice, and I know this makes me sound rather big headed, but this chair is awesome! And it smells like coffee!


Now maybe I will finally finish this to match it.


Wednesday 28 September 2011

Food creativity

I have just made my third batch of shortbread in three weeks. Luckily these have all been, mostly, to give away so I won't get too fat. You can see how to make this most tasty shortbread here.

Wednesday 14 September 2011

A Birthday Project

For my birthday in May a good friend gave me a great book. Home-Made Vintage by Christina Strutt is an easy to follow guide with over 40 sewing projects, ranging from cushion covers and simple curtains, to dolls, bags and skirts. As it is a Cabbages&Roses book, it is filled with beautiful photos of vintage style fabrics and has some great ideas for personalised gifts. Projects range from simple to time consuming, but every one is "do-able", with a little patience, even if you've never used a sewing machine before.

As my friends birthday is a few months after mine I had enough time to try out one of the projects as a present. She had already pointed out the tied tablecloth and as she is a fantastic cook and hostess, something for her kitchen table was most appropriate.

As the book has such good instructions I won't explain how to make the tablecloth, but here are some photos of what you can do with just a couple of metres of your favourite fabric and 3 metres of ribbon.


Friday 5 August 2011

What makes a home

It has been a quiet week work wise but we very excitingly received our name plaque for the front door. It now really feels like our home.

But then I realised what makes it feel like home even more is the warm friendly presence of our dog. She is a constant source of hilarity whether she is looking out the window...


Sleeping in the garden...

Sleeping in the doorway while we paint...

Sleeping on her favourite pillow...

Snuggling up by the boxes...

Or watching pigeons in trees...


Next week there will be upholstery on here!

Thursday 28 July 2011

Bargain Bed

As anyone reading this who has stayed at the Briggs house knows, our guest bed is a very uncomfortable pull out sofa bed. Not any more. We managed to get ourselves an ex-display bargain whilst buying dinner last week in our local Tesco! The kind man who helped us even proudly threw in the headboard free to seal the deal. I could not bring myself to tell him that the tired looking cheap plastic faux leather headboard would not be going anywhere near my new home. But once we got it all home I realised that I own a staple gun and a cupboard full of material - genius!


It is now covered in a grey/blue tweed from the wonderful Bute Fabrics - I always buy a bit extra from them because you never know when you might need some tweed. We are now ready for visitors...

Saturday 23 July 2011

Two Chairs


 This week I got the chance to work on two chairs. It was quite a challenge since the client had chosen a luxuriously thick patterned material of which there was enough by millimetres, there was so much piping to stitch, and I had to make the second chair look exactly like the first!

I started by stripping the original material off. These chairs were modernly upholstered, i.e with foam and staples. I found a ten pence piece inside with 1992 as the date - though obviously this means they could have been upholstered any time since then, I like to think that someone put the coin in as a memento of that particular year. That would mean I was just six and still aspiring to be a pig farmer when these chairs were last worked on, never imagining that I would grow up to be an upholsterer. Anyway...

Modern upholstery is notoriously hard to strip since you have to use so many staples to keep the material in place. It is difficult to get your staple remover under the old staples and results in many blisters - very tiring work...


Once the material was off I separated each piece and used them as a template to cut the new material. This was tricky as the pattern needed to match up when attached to the chair, and due to the amount of material there was no room for error.


When the material was cut I started stitching the panels together and stitching the piping. I strongly believed that practise makes perfect and the more piping I stitch the better it will get. That was until an upholsterer friend of mine, who is a pro on her sewing machine, told me that she still finds piping a nightmare. I fear I will eternally dread it.
But, once the stitching was all done I got onto the fun part. The seat material was temporary tacked (i.e with tacks not hammered in properly so they are easily removed to change things) so that I could get the pattern on evenly and pull the material tight. Once this was exactly how I wanted it I stapled it onto the frame. The arms went on next, again with temporary tacks to ensure both arms matched before being stapled. Then the seat back was stapled down and I hand stitched the piping edge to the edge running against the arms. Finally the back was attached and I glued on two lines of braiding to cover the staples.


Although a challenge, these chairs provided a good chance to practice some new and old skills, I am pleased with the results, and there was even a good sized off-cut to make a bonus cushion cover!